

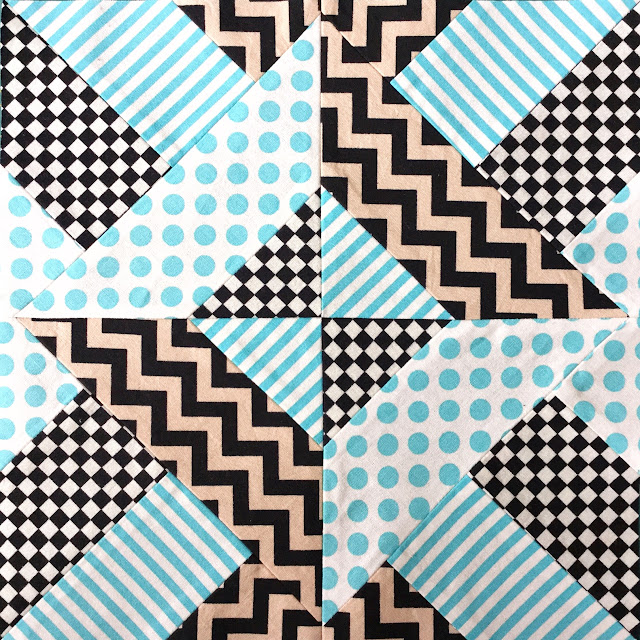
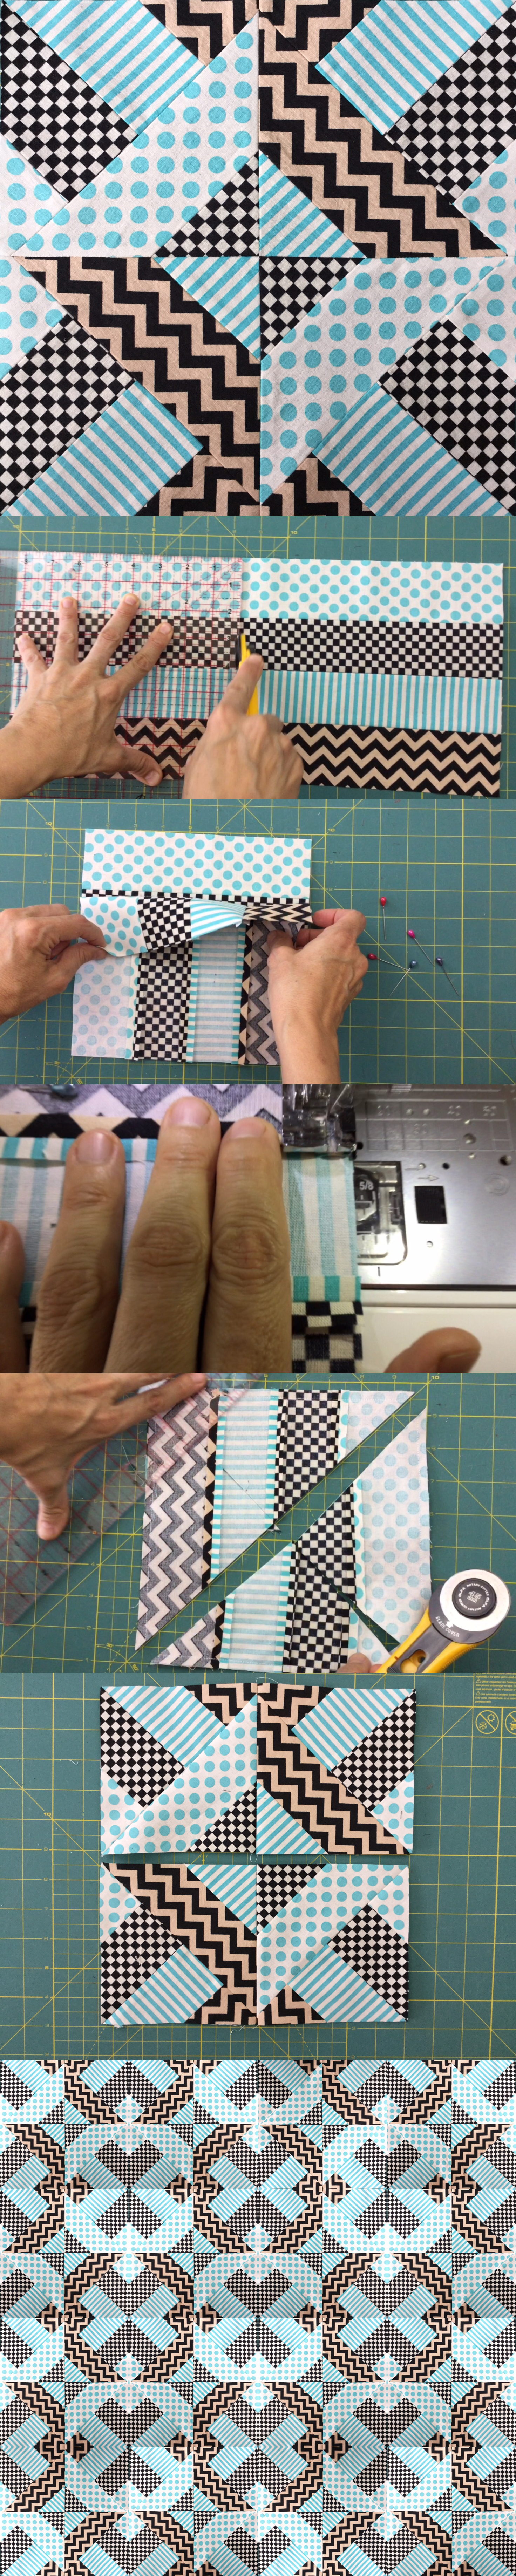
This block can appear to be a bit complex at first sight but it’s quite simple to do. All you need is 4 strips of fabric the same size sewn together. Use high contrasting fabrics for better results. My choice of fabric makes this block a bit hypnotic, don’t you think?
How to make the Doubly striped Half Square Triangle / Hidden wells block
Learn how to make this block in just over one minute:
Make the tutorial twice and make a different block altogether! Learn how:
Some ideas for extending this block
This block can be made into a scrappy quilt by using your fabric scraps or jelly rolls. I do find however than this block works a lot better, and I mean A LOT, if you plan your fabrics and colours.
Colours
For instance, use fabric that are high contrast and alternate them:
- acqua and black,
- red and white,
- red and black,
actually any light colour and black or white would work well.
Use only 2 fabrics, one print and one white or black.
Try with solids. Black and white would look great.
Use complimentary colours or interesting colour combinations. Checks, strips, polka dots, types of fabrics work great.
Work with tone on tone fabrics or with few colours.
Do blocks in 2 different colour schemes that work together and combine the pieces.
Strip width and number
You can play with the width of the strips. To keep it symmetric you need to make sure that your outside strips are the same width and the inside strips are the same width as well.
You can use more than 4 strips too as long as they are even numbers and you keep the width symmetric as well.
Note: Since I made this block I’ve been told repeatedly that this technique was developed by the 3 dudes however I have come across earlier examples of this type of block going back to 1989 and Mary Ellen Hopkins and her quilt Hidden wells. Go to google and look up Hidden wells and you’ll see so many quilts using this technique. They’re spectacular.
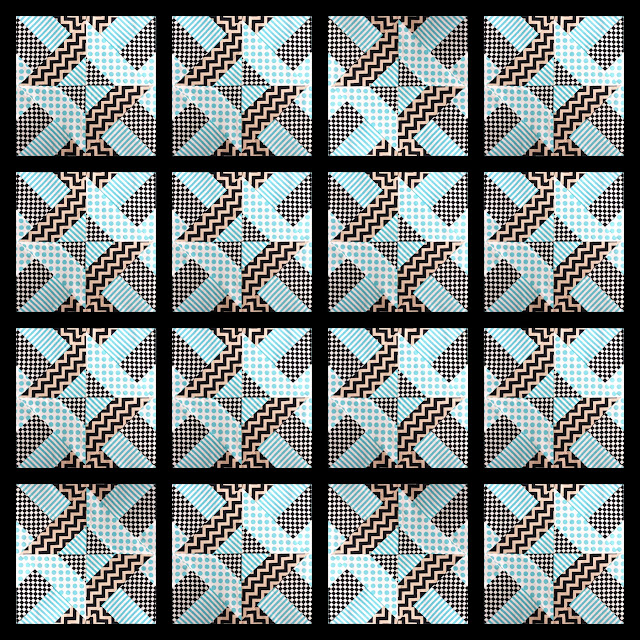
As you can see the possibilities for this block are quite incredible. The quilt layouts are also varied.
Quilt layout with sashing
Layout 1
Quilt with sashing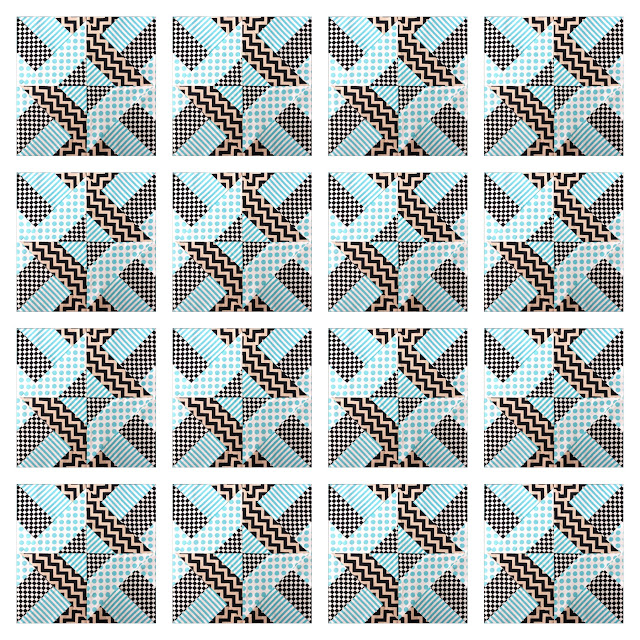
Layout 2
Quilt with sashing in black. Other colours can be used to match your choice of fabric for the block.
Quilt layout without sashing
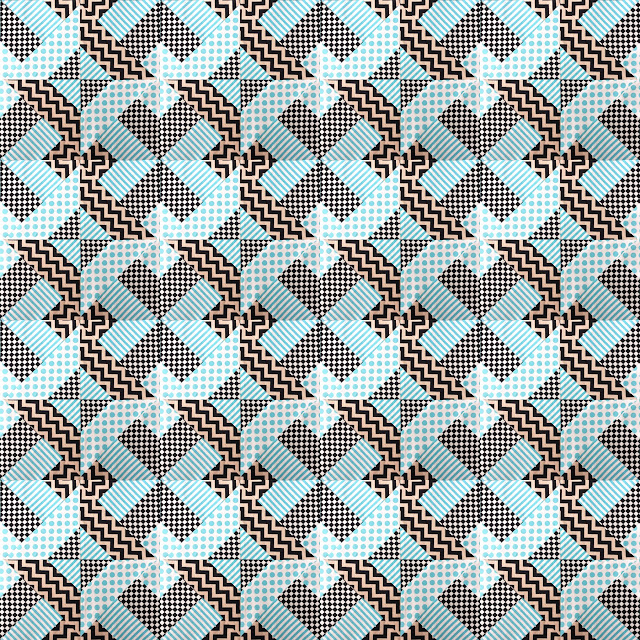
Alternative placement of blocks
Order my book Turnabout Patchwork
“Turnabout Patchwork. Simple quilts with a twist” is all about playing with blocks – making a block, slicing it up, and turning or repositioning the pieces to make a completely different block (sometimes two smaller blocks) to yield endless quilt tops.

Do you wish to receive my tutorials in your inbox?
- Look for the FOLLOW button in my blog
- Subscribe to my Youtube channel
Have you made any of my quilts or tutorials?
If you make any of my tutorials and upload pictures to Instagram please tag me with @teresadownunder on private message me in Facebook with some photos and I’ll post them for everyone to see!
Visual process

I just love your short and to the point videos. Cannot wait to try this one with scraps? And maybe one solid color strip to tie everything together? Wonder how that will look……..even if I do mine just like yours with all prints, I know I will like the ease of it……..THANKS
LikeLiked by 1 person
Thank you Dottie. I´m very happy you like my short videos. I make them the way I like them so I thought other people may appreciate them too. Good luck with this block. I only tried one fabric combination but your solid and print combination could work out really well. I think this block is very versatile in this way.
LikeLike
Thank you, I also love your short easy to follow videos.
LikeLiked by 1 person
Thank you Gail! Very happy to hear that.
LikeLike
Unbelievable easy…. it really Looks much more complicated. Thanks for showing us!!!
LikeLike
Happy to share it.
LikeLike
Love this! My daughter and me are making hot pads for all the family members for Christmas. We have all kinds from string squares to pinwheels to this now. We made this today & love it. It looks so complex, but super simple. I already have some more cut out for her to sew on tomorrow. If you look this title you gave this up on Pinterest, you are the only one with this. Is there another name for these? Or, did you come up with this on your own?
LikeLike
I actually have no idea if it has a name. I made the name up based on the kind of fabric I used and it being a half square triangle. But I just did a bit of research and It’s probably called 3 dudes. I hope this helps.
LikeLike
Fun! My daughter is just 10, so she is very new to any kind of quilting herself. Right now she is eager to jump in and learn a new square. She felt so proud of this one. I think I may made it as a baby boy quilt soon using some manly fabrics. I know babies like the busy black and white patterns, so that might be a good idea.
LikeLiked by 1 person
That sounds like a plan! Good luck with it! That’s pretty good quilting at 10. She may want to try some disappearing 4 patch blocks too.
LikeLike
Thank you for the tutorial, I’m a beginner and need the easy ones. I need to know how much material I needed, I want to use 4 to 8 fabrics? Thanks again.
Linda
LikeLike
Hi Linda, for a block you need 4 strips of fabric each 2 1/2inch x 18 inch? This block is perfect for fat quarters. Fat quarters are usually 18 inch x 22 inch. For 16 blocks and 8 fabrics you will need 8 strips of each fabric. Do you agree?
LikeLike
What size is the block when it’s finished?
LikeLiked by 2 people
Pam, it’s 7 1/2 inch square.
LikeLike
Love it! If one wanted to mKe 12 1/2″ finished blocks, what size strips would be needed?
LikeLiked by 1 person
My math isn’t great but I think that this block will work with any number of strips as long as it’s an even number. So you could use 12 strips 1 1/2 wide.
LikeLike
Wrong answer. There’re some formulas you can use to calculate the starting square size: http://www.mccallsquilting.com/mccallsquilting/articles/Pieced_Squares___Quick_Quarter_Square_Triangles Then when you have the starting square, divide by 4 and add 1/2 to find the strip width. My math isn’t great so I’d do a test run first
LikeLike
The block was designed by the 3 Dudes quilt shop. Missouri Star Quilt Company did a video tutorial on how to make it. You can find it on YouTube at https://www.youtube.com/watch?v=L5Ixvjje310. So cute and easy!
LikeLiked by 1 person
Susan, thank you for that information.
LikeLike
If I were to buy yardage (instead of using a Jelly Roll), how much of each print would I have to get to make a quilt somewhere between a throw and twin size?
LikeLiked by 1 person
Lisa, My math isn’t great. I don’t want to give you a figure and then be wrong. There’re a number of quilt fabric calculators online you can use.
LikeLike
I would like to make this 12-1/2 by12-1/2 blocks, how long would I make the strips?
LikeLiked by 1 person
Tracey, there’s a formula for HSTs around the square here http://www.debraholster.com/the-versatile-half-square-triangle/ Once you work out the starting square size, divide by 4 and add 1/2 inch to the resulting strips.
LikeLike
Wow!!!! Beautifulllll, & quick!!!!
LikeLiked by 1 person
I have watched all your tutorials. I am so amazed at how quick and easy your blocks are. Such talent. I’m going to try your origami block in a table topper. Please keep the tutorials coming. Great work!
LikeLiked by 1 person
Hi Linda, thank you very much for your kind words.
LikeLike
Love how you made this pattern so simple. Thank you so much. Enjoying your videos.🙌🙌🙌
LikeLike
Thank you!
LikeLike
amazing! fabulous!
LikeLike
Hi Teressa are these blocks on the bias, once they are cut, mine seemed to be a little stretched!
LikeLiked by 1 person
Jennifer, I’ve never had a problem cutting on the bias but I’ve heard it can happen.
LikeLike
Hi Teresa, I need to practice some more to get them to match up, love the way it looks, thank you.
LikeLiked by 1 person
Practice makes perfect!
LikeLike
why can’t we just print the pattern and not all the tutorials
LikeLiked by 1 person
Hi Patsy, I’m not sure what you’d like to do…
LikeLike
Reblogged this on chaosfay and commented:
I will absolutely have to use this block. The possibilities for layouts and size has be stoked!
LikeLike
If you take 4 strips that are 2-1/2 ” each and sew them together with 1/4″ seams, your total should be 8-1/2 inches, not 8-1/4.
LikeLiked by 1 person
That is the math, you’re right. My quilting in the other hand is not as accurate that ‘s why it’s best to measure the piece after sewing to make sure you cut a square if you think your sewing is not 100% accurate
LikeLike
I have a lot of red/white/blue prints, blenders and solids left over from 2 quilts I made. I think this is the perfect project to use up those pieces!
LikeLiked by 1 person
Good luck with it
LikeLike
What is the finished size of your block? Curious because I might want to make a different size. Sorry if I missed it in the post.
LikeLike
No matter how precise I sew, I cannot get the blocks to 8-1/4, so I cut as close to that as possible, sew the squares together and then I’m trimming the block to 5-1/4″.
LikeLiked by 1 person
This method is not the most accurate. Starching the fabrics may help But trimming is a good solution too.
LikeLike
I love the things yo do with the squares
LikeLike
Thank you Diana.
LikeLike
I am a first time quilter, i have all my squares done in 4 blocks, my problem is, i got the top and side riws done, but how do i sew the rest together without seeing the seams? Thank in advance
LikeLike
How wide should the strips be to make a finished block of 12″?
LikeLiked by 1 person
If you are 100% accurate in cutting and sewing the strips should be 3.5″ for a 12″ finished block.
LikeLike
I love this! I saw it on pinterest and just had to try it. I used a jelly roll from my stash and watched the tutorial. Worked out perfectly and looks so nice! What a great stash buster this block is! Now, excuse me, I must get back to sewing. Thanks again for the inspiration!!!
LikeLiked by 1 person
Thank you Rebecca. I’m happy you’re having fun!
LikeLike
great stash buster. Thank you.
LikeLike
Wow, just love your tutorial. I will fir sure try this.
LikeLike
I love the video’s. Just they would tell the size of the finished block.
LikeLike
This is my first try at jelly rolls. I have not made but 3 quilts, and I an still in the learning phase. But I have made two squares this morning, and I am in love with this easy pattern. I hate cutting out the pieces. But this is just a breeze, I am sold on jelly roll quilts. Thank you for the pattern.
LikeLiked by 1 person
That’s fantastic! If you post photos on Instagram or Facebook please let me know. I’d love to see what you make
LikeLike
OMG! This is CRAZY easy! So easy even I could do it – and says a lot…! I have an idea: use one pattern (like only dots) in 3 or 4 shades.
LikeLiked by 1 person
Using fabrics in different shades of the same colour in an ombré fashion will make a stunning block.
LikeLike
I really want to make a kind size quilt with these blocks. Do you have an estimation of how much fabric I need to buy (using 4 colors)?
LikeLike
Sorry Jacqui, I don’t.
LikeLike
I use these calculators to work out yardage sometimes http://www.quiltersparadiseesc.com/Calculators.php
LikeLike
Love these short videos. I am using the tulip pattern now!
LikeLike
That’s great Martha! The tulip is very popular.
LikeLike
Here we go, years after you wrote it I’m pinning it. Love your videos. I have a really old copy of Mary Ellen Hopkins Hidden Wells, long before You Tube was even an idea, so you are right on the source.
LikeLiked by 1 person
Mary Ellen was great.
LikeLiked by 1 person