

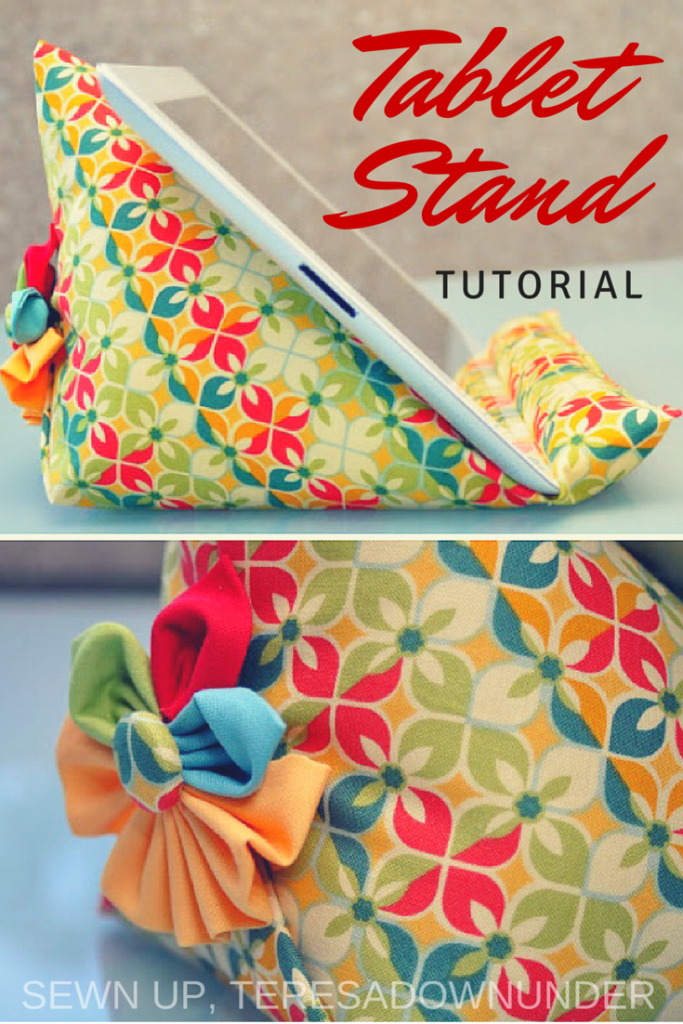
Get ready to create a functional and attractive iPad stand or table stand with this step-by-step tutorial. Whether you choose to make a bean bag stand or repurpose a pair of jeans, you’ll have a unique and decorative way to hold your iPad or other devices.
Let’s dive in and add some style to your tech setup!
First let’s watch a video tutorial.
Video: How to make an iPad stand or beanbag
This tutorial is for a stand using the leg of a pair of jeans instead of fabric:
Materials
- 1/2 yard of fabric
- Fabric scraps for the flower
- Self-covered button
- Polyfill stuffing
- A stone or weight
- Cardboard
Downloadable templates
- Pad cardboard base (pdf) – adjust size if needed (top: 3 3/4″ wide, bottom: 7 3/4″ wide, height: 5 3/4″)
- Denim iPad cardboard base (pdf) in smaller and bigger sizes (trim if necessary)
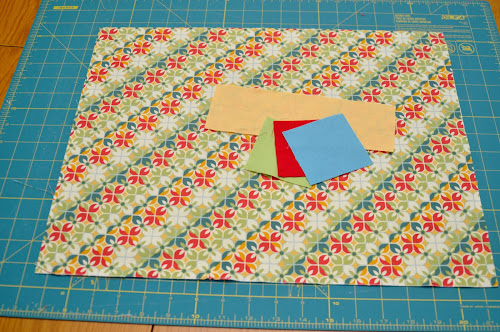
Making the flower
Cut one long rectangle measuring 2 1/2″ by 8 1/2″ and three 4″ squares.
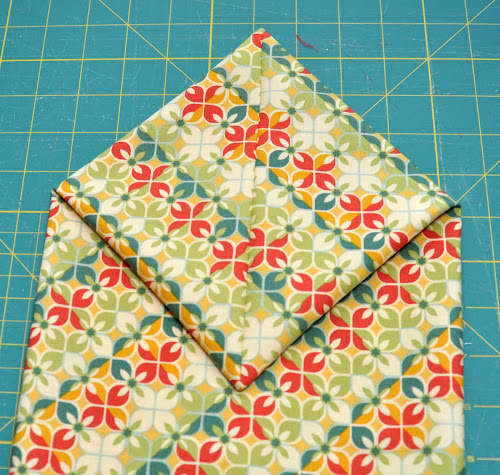
Fold the squares in half twice and iron them.

Trim the corner of each folded square as shown in the picture.

Use a long stitch to gather the fabric pieces, creating a small hole for the button.
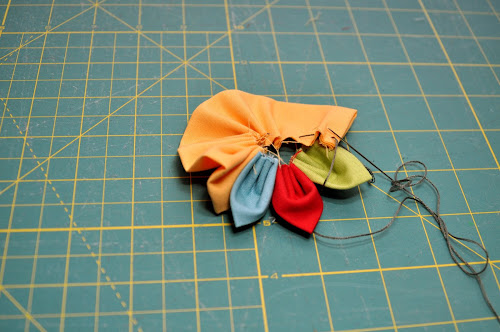
Attach the button to the center of the gathered fabric.

Creating the Bean Bag
Cut a rectangle measuring 18 1/2″ by 16″.
Fold the rectangle in half lengthwise with the right sides facing each other, using the 18 1/2″ side to fold.
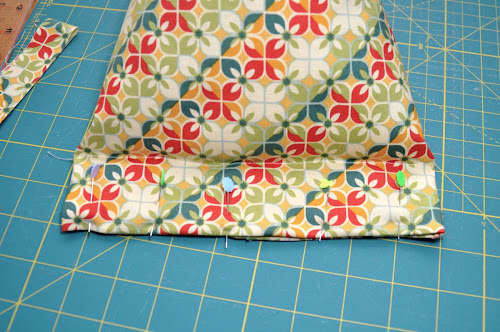
Pin the sides together, leaving one narrow side open.
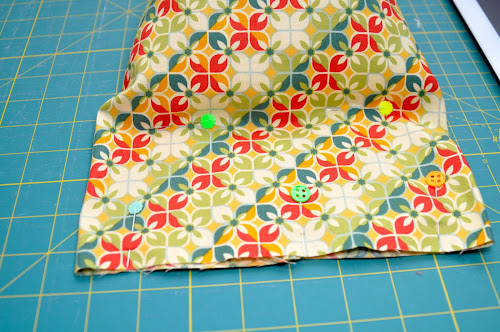
IMPORTANT: The photo below does not show the correct rectangle size. My original pattern was longer than 18″.

Sew along two sides, then trim the corners

Turn the bag inside out and flatten it with the seam touching the table.
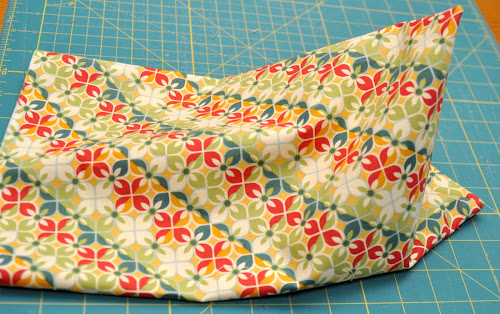
Make sure the seam is in the middle and flatten the bag as per picture.
Find the middle point and mark it with a pin.

Fold the bottom corner up as per picture. This is where the flower will be stitched.
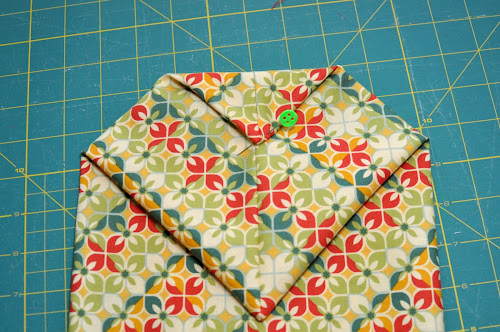
Hold the bag up with the pin in place, ready to stitch the flower onto it.

Sew the flower securely to the marked location.

Filling the iPad stand
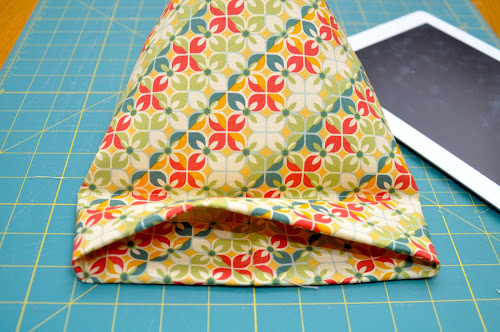
Cut the cardboard base using the iPad beanbag cardboard base (pdf) and place it inside the bottom of the bag.
Add a stone or weight on top of the cardboard for stability.
Fill the bag with polyfill to your desired level, ensuring it can support the weight of the iPad.

Once filled, pin the opening of the bag together, starting from the edge of the cardboard.
Sew around the edge of the cardboard to secure the filling in place.

Making the wedge
Fold the fabric in half as shown in the picture.
Pin along the folded edge.
Sew very close to the edge, securing the folded fabric.
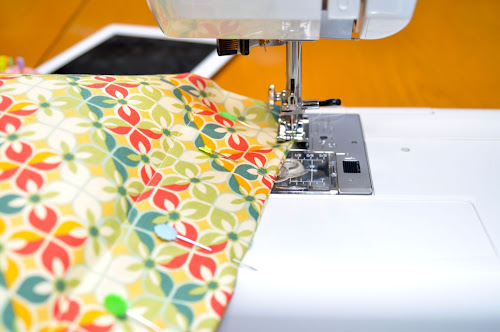
Leave a small opening and fill the resulting tube with polyfill, making it slightly firmer than the bean bag.

Stitch the opening by hand to close it.
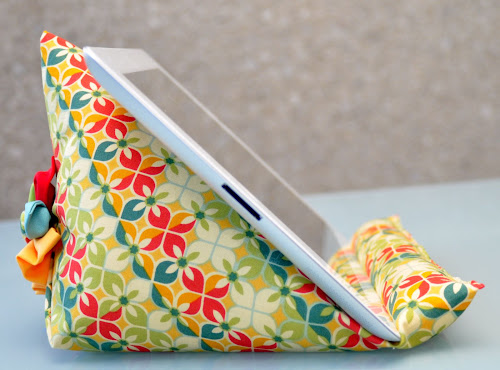
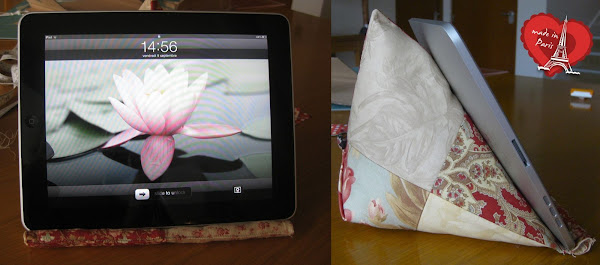
That’s it! Your beautiful and functional iPad or table stand is ready to use!


The stand from behind.
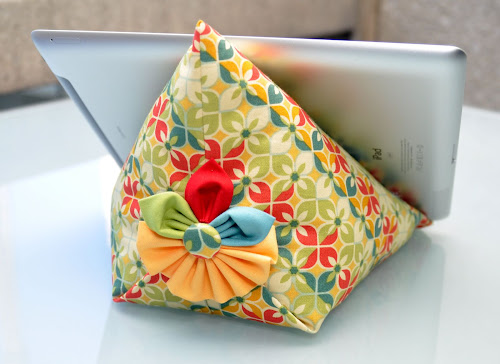
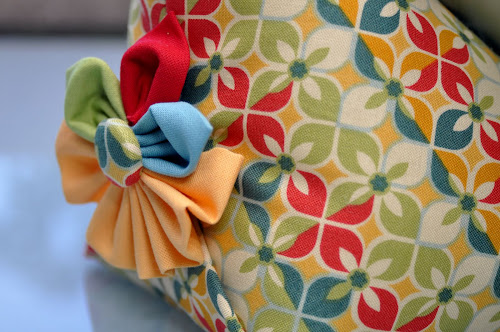
Closeup of the flower.

My other iPad bean bag tutorial.
Join my Patreon page

Get a new video tutorial every week plus other exclusive perks with 3 membership tiers.
Stay connected
Subscribe to my blog, follow me on YouTube , Instagram or join my Facebook group and Facebook page.
My book and other publications
You can now purchase individual chapters from my book as bundles of 4 unique quilt patterns.
If you prefer to own the complete book, Turnabout Patchwork, please note it is currently out of print. However, you might still be fortunate enough to find a copy on Amazon.
Explore all the quilts from the book in real-life projects!


bende yapıcam çok güzel
LikeLike
Bello y práctico como todas las labores que compartes, gracias feliz añ0 2013 desde México
LikeLike
This is so cute. I must make one, thank you for info.
LikeLike
That is amazing! Cannot wait to make one for myself and several for gifts for
friends that didn’t even know they needed one!
LikeLike
Love this project. I want one! Just have to find time to make it. Thank you for sharing.
LikeLike
I’ve been trying to figure out how to make one of these since seeing them on Pinterest, thanks so much for the tutorial, Ferb, I know what we’re doing today!
LikeLike
I dont understand the measurements of the large rectangle…. according to the pic they are not the 18 1/2 x 12 that were listed in the cutting information.
LikeLike
Wenda you’re certainly observant! That is because I needed to adjust the sizing whie I made it.
LikeLike
I would love to have permission to link to your tutorial on our blog. Please email me if I have permission.
Pineneedlesatgardnervillage.blogspot.com
pinendl@aol.com
LikeLike
Great idea! I had the same question about measurements. Appears the large rectangle is closer to 28 1/2 X 18. Is that correct?
LikeLike
Ops, typo on measurements. Is the rectangle 18 1/2 X 14?
LikeLike
The size in the photo is not real. I had to trim the rectangle in the end because it was too big. Use the size given in the tutorial, 18 1/2 x 12, unless you want a larger beanbag.
LikeLiked by 1 person
I love this design and really wanted to make this! Started it tonight exactly as written and have to agree with others that the large rectangle is too small. The wide end of the cardboard template is over 6 inches and doesn’t fit into the 12 inch (minus seam allowance which wasn’t specified, I used about 3/8 inch, perhaps it is supposed to be smaller?) side of the sleeve. I also could not fit the flower on to the back without it hanging on the counter because the square that is created is much smaller than that pictured. Perhaps I was supposed to fold this on the 18 1/2 inch side but it is very hard to tell from the picture because the piece you used doesn’t look like the size specified. This was going to be a gift but isn’t now. I think the tutorial photos are lovely. It’s a great idea. It needs some tweaking: the flower instructions are rather vague and incomplete with regard to the longer strip which I think is supposed to be folded in half but that isn’t stated, it’s unclear which way to fold the fabric to seam it and there is definitely an issue with the rectangle measurements!
LikeLike
I was able to rip it apart and start over, folding it this time on the 18.5 inch side…Much better! Now I’m trying to decide where to place the cardboard piece–all the way to the squared end of the back or just in the middle? It still seems a bit small to me. I may try it again using different dimensions but thanks for a beautiful design.
LikeLike
Worked great for me. Thanks. Now to make your IPad cover.
LikeLike
Sorry about that Kristen. I should add a disclaimer “make at your own risk”. You probably folded it on the wrong side. It should be folded in the widest side. I did trim the bag after filling it because I had too much fabric left to make the wedge but the width is 18 inches.
LikeLike
Thanks Kath. I was starting to doubt I wrote down the wrong sizes.
LikeLike
Parabéns!!adoreiiiiii!!!!
LikeLike
Merci, je viens de le réaliser et c’est un super tuto.
Tank you very much
LikeLike
I finally had a chance to make one of these. Instructions were easy to follow. Used the size listed for the rectangle and it worked perfectly! Thank you!
LikeLike
Great Jan, I´m glad it worked out for you.
LikeLike
This is a super idea and very helpful tutorial. I bet it would work for reading a kindle too!
LikeLike
I love this! The fabric choice is so perfect. I need to make one – and then go buy and iPad!!
LikeLike
Thank you so much for this tutorial! I have made three already and have more friends asking for them!
LikeLike
I like it a lot. Having difficulty figuring out the exact size the cardboard should be. Could you post a measurement?
LikeLike
Debbie, you must have missed the download for the iPad stand base. Here it is https://mypatchwork.files.wordpress.com/2012/06/ipad-beanbag-cardboard-base.pdf
LikeLike
Thank you so much for sharing this pattern, it is such a great idea and will be perfect to sit on my lap while I watch TV and surf pinterest. I so admire people who are able to design things like this. I made one last night. I folded it wrong the first time and had to rip it apart. What worked for me was to take one of the 12 inch sides and match that with the other 12 inch side so the folded rectangle was 12 x 9 1/4. The cardboard template would be more helpful if it had measurements. I printed it twice and it came out different sizes both times. What worked for me was 6″ across the top, 8 3/4″ across the bottom and 4 1/4″ high. Don’t know if that is what was intended but it worked out for me.
Thanks again!
LikeLike
Thank you Jane. I added the carboard base measurements to the tutorial to make it easier.
LikeLike
me encanta por lo bien explicado sobre todo para novatas como yo
LikeLike
You did a fabulous job on this tutorial. I will be featuring it at PatternPile.com/sewing-patterns/
LikeLike
You did an awesome job! Your directions were very clear and your photos were spot-on! Congrats girl.
LikeLike
Thanks for your feedback. I’m amazed at how popular this tutorial has been.
LikeLike
Just finished one. Faaaabulous! Exactly what I needed. I thought you explained (or clarified) your measurement well. Thank your cleverness and time.
LikeLike
Thank you Kate. And thank you for the etsy suggestion. I should give it a try. Will need to think about it.
LikeLike
Thanks for the tutorial, I will be making this soon. I was just wondering about the stone/weight bit. For those of you that made this did you use any type of weight? If you didn’t, did it work out ok? I guess I’ll try to think of what I could put in it to stabilize it. Any idea how heavy this weight should be? Thanks.
LikeLike
Hi Debbie. Use a medium size stone. It doesn´t need to be very heavy, just enough to stop the stand to be knocked over easily. About 200 or 250 grams.
LikeLike
It may be ok without the weight I guess. I thought of using a weight because the filling is very light and some weight would help in making the stand more stable.
LikeLike
Thank you very much for the quick response! It does make sense if you use polyfill to add extra weight in there but I am thinking of using rice of maybe beans so maybe I dont need anything additional for stabilization.
LikeLiked by 1 person
In that case you should be fine I guess.
LikeLike
Could u make a smaller one for an iPhone?
LikeLike
Sandra, I thought of making one one day. You can adjust the ipad one by making it smaller. You need to work out how much smaller the iphone is and do the math. For instance, is it half the size? One third? and adjust accordingly.
LikeLike
I was looking for something like this to have at work for my iphone. I know there are tons of stands for sale online but I want to make my own!! My estimation is that the iphone is about 1/6 the size of the ipad or about 20%. I will let you know if it works when I try it.
LikeLike
Thank you Jacquie. That’d be great!
LikeLike
Rather than a rock for weight, look into Teddy Bear making supplies. I have used glass beads made for stuffing bears. If I remember correctly, there are other options.
LikeLike
What do you think would be measurements for a mini ipad?
LikeLike
This is just great, Teresa. With more and more friends acquiring iPads, these will make perfect gifts for them. Thanks for posting the tutorial – I learned about it from The Quilt Show Blog in case you wondered.
LikeLike
Gwen, I don’t know for the iPad mini but you can maybe try wit a 20% or 30% smaller rectangle.
LikeLike
I was thinking the same thing on the filling–what do they use in those neck support pillows they sell at the ariport-I’m thinking that would work great!
LikeLike
Love the stand. I am going to do it this a.m. for a fun thing and then show it off at our guild. Just love the ingenuity.Good for you.
LikeLike
Just finished making this finally, thank you so much for the tutorial!! I did use beans instead of a rock and put fiberfill to fill up the top. The only other change I made was sew a second row of stitch 1/2″ after the one that held in the beans and fiberfill to give more of a space for the iPad to sit. I have a case on mine so I think the extra space made it fit better. Thanks again, I’m loving it so far and can’t wait to use it tonight when I’m reading in bed.
LikeLike
Debbie, why don’t you post some pictures of it at http://www.flickr.com/groups/1933379@N22/
LikeLike
I think this is a great idea and I am looking forward to making it as a gift for my sister and my friend.
LikeLike
j’ai réalisé quelque chose de similaire mais à base d’un berlingot, mais je vais testé votre modèle,, merci pour ce tuto
LikeLike
Ce n’est pas trop different d’un berlingot, c’est vrai. Et ca marche bien le votre?
LikeLike
Just loved making this ipad stand and have made 6 as presents already. Used brick fabric and stitched graffiti on it for my son! Thank you for sharing design.
LikeLike
Love it!
LikeLike
Wow!!!! Just wow. If I can do it anyone can, had to rip the seams once cause I didn’t follow the pictures and put the wrong side up. Figured it out though. So THANK YOU SO MUCH. Made the first one for my Hubby.
LikeLike
Just put together two of these and love how they look! One question I have is whether the cardboard dimensions are accurate – it would seem like they should be 4 1/4″ wide at top, 6″ on the sides, and 8 3/4″ on the bottom. Using your measurements I could only have the front half of both of mine with the cardboard support on the bottom.
LikeLike
Kim
3 3/4 fot the narrow side, 5 3/4 for length and 7 3/4 for the wide side are the sizes of my cardboard. I jus measured it.
LikeLike
Could you tell me what seam allowance you used? 5/8″, 1/2″, 1/4″???
LikeLike
Hi Wendy, I used 1/4 inch seam allowance.
LikeLike
I have just found your blog and started to follow with the charm tote. Now I will be making one of these for my PlayBook and three others for galaxy note 2 phone, galaxy tablet and iPad mini.
Have just realised that they will make great wedding presents so, 2 more for an iPad and iPad mini!
LikeLike
Did anyone ever perfect the measurement for an iphone?
LikeLike
would you happen to know the name of that fabric you used for the body? Really cool – Love it!
LikeLike
Keri, the fabric is from the Early Bird by Cosmo Cricket. Sunrise is the name of this one http://cosmocricket.typepad.com/cosmo_cricket/2009/04/early-bird-sneak-peek.html
LikeLike
Well, sunrise is the name of the paper range. Flower mosaic is the name of the fabric colection Early Bird http://www.thelittlefabricshop.com/Products/early-bird-flower-mosaic.aspx
LikeLike
Wonderful., I often use my Ipad while watching TV at night in my bedroom. My husband usually has something on, that I’m not interested in. So hence the ipad in the bedroom. I have trouble keeping it from slipping off a pillow or something. This looks perfect. thanks for the directions.
LikeLike
I just made one today! The only thing I did differently was I made a small bean bag filled with rice for the weight. I had so much trouble trying to sew the bag shut and keep everything in the right place. Any tips? I’d love to make another one but I need to go in with better sew me shut instructions lol. Thanks!
LikeLike
You could try and baste the bag by hand first.
LikeLike
Wow! This is a brilliant project! Love it! Thanks so much for sharing the great tutorial! Would love to have you visit me sometime.
Have a fabulous day!
Hugs from Portugal,
Ana Love Craft
http://www.lovecraft2012.blogspot.com
LikeLike
So cute! I’m grateful there are talented and crafty people like you to help a completely uncrafty person like me!
LikeLike
Just made my own and extremely happy! Wanted to say thanks and let you know how good this was! Brought lots of different fabrics and making Christmas presents! Thanks again!
LikeLike
thank you very much, I already made one for myself. you can see it in face book “Dirty Cat”.
LikeLike
Absolutely fabulous! Thank you. I filled a small bag with ceramic pie weights and put that in on the cardboard. It works a charm. Thank you for sharing.
LikeLike
I used a sheet of stiff plastic – cut from a $1 place mat instead of cardboard.Makes the whole thing washable. Thanks for great pattern
LikeLike
That’s a great idea Annie!
LikeLike
Thank you for this tutorial. We’re doing a limited budget christmas this year so I’ve made one each for Mum and Dad.
LikeLike
I made it today! I got mixed up the first time, and made the first fold incorrectly, but soon realized it wouldn’t be long enough for my Ipad to fit/rest against it. I cut the template out of a warped cutting mat, which added great stability. I love the little touch of whimsy with the flower. Didn’t have a big enough button to cover the center hole, so tacked the flower down, tacked the midpoint of a ribbon to the holder and tied the ribbon through a silver western concho that I had leftover from another project. Thank you so much for sharing your pattern. Barb
LikeLike
Hello,
I made one just now. I made one for my iPod. I misfolded the large rectangle so I have one just perfect for the iPod. I will try and send a picture.
PCPAT, the Netherlands
LikeLike
I can’t get it done. Sorry. I put a picture here:
PCPAT, the Nethrelands
LikeLike
Thank you for posting the picture. It looks really good.
LikeLike
Thanks. You made a real good tutorial. It was easy to follow. Although it is not my language 😉
LikeLike
Loved this tutorial! I made one for a friend’s birthday, and she thought it was just amazing.
Posted a photo- http://www.flickr.com/photos/61289695@N06/12053718863/
LikeLike
Thank you for showing me the picture. It really looks very well done and I really like your choice of fabrics and buttons.
LikeLike
I am wondering if this would work as a book stand for me?? I read in bed at night with a book on my chest area. Do you think that I could use this to prop up my book and use it as almost a handsfree reading device? Just wondering if you or any of your followers have done this?
LikeLike
I tried with a thin book and it’s fine. For thick books it may be better if you left a space between the bottom sausage and the other bit by stitching next to the sausage and then one inch further from the sausage. I’m not sure this is clear.
LikeLike
very clear and now, obvious. Thanks for the reply, I am going to try to make this soon.
LikeLike
Thank you so much… I, too, folded it the wrong way.. but once I fixed this , all went well.. Hope my granddaughter loves it as much as i do…
LikeLike
I may be being thick here (most probably!), but how on earth do you get the polyfill inside without it spilling out everywhere? I have tried and ended up with a floor full of little foam balls! The stone to hold the cardboard in place doesn’t seem to work, either – help!
LikeLike
Hi Jenny, I use the fiber type of polyfill. Batting scraps will work as well, but if you want to use beads try stitching across most of the opening leaving enough space to place in a funnel and fill it in through the funnel. If you don´t want use a stone you can use some rice instead like half half. The weight can be anything that will provide some stability to the bag because the filling is usually very light. I hope the suggestions help.
LikeLike
That’s brilliant, Teresa – thanks for the reply 🙂
LikeLike
Just finished the iPad holder, very pleased with the finished result! Many thanks x
LikeLike
Hi. I haven’t made this yet but have just the fabric for it. Just wanted to add a hint that plastic canvas makes a good firm stabilizer that won’t break down like cardboard might in time. I use it a lot for the bottom of handbags (purses, pocketbooks). You just have to be sure to trim the pieces well so the edges are smooth.
LikeLike
Dale, thanks for the tip. I’ve never seen or heard of plastic canvas stabiliser but that’s just what I need! I’ll research it.
LikeLike
Hi Teresa. Plastic canvas isn’t meant for a stabilizer. It is for its own craft. Something like crossstitch but on a slightly flexible, though firm plastic instead of crosstitch canvas or linen. The holes make it breathable (even washable) while giving a firmness to your project. It is cheap and any hobby place should carry it.
LikeLike
Thanks for explaining. I’ll see if I can find it for another project I have where I need some sturdy plastic or something
LikeLike
I love it. Thank you for sharing.
LikeLike
Thanks a lot for the tutorial, I made one which turned out great thanks to your clear instructions! I posted some pictures of it on my blog and linked back to your tutorial. Again: merci and greetings from France 🙂
LikeLike
Sara, it looks great with your choice of fabric.
LikeLike
6 done and 3 in the making. Foam board works good for the cardboard. I hand basted along the cardboard edge and then use my zipper foot for sewing. JUDY
LikeLike
I made one today but i wasn’t making mine for an i pad.I do a lot of cross stitching,and usually put my magnetic board that holds my chart on one of those metal easels.Problem with that was it’s slippery so keeps falling off the arm of my recliner.So i changed the measurements using my magnetic board as a guide to make mine.I filled it with the stuffing,and for the pillow part i used unpopped popcorn,Sewed it most of the way up and just left a small opening to fit a funnel so i could fill it,then sewed the rest by hand.It’s not perfect,but it works.
I got confused on where that cardboard would end up,is it supposed to go up the back,or is it part of what i call the seat,the part that sits on the chair arm.So i just winged it.
Thanks for the tutorial.
Kathi
PS i also used my zipper foot.
LikeLike
The cardboard goes at the bottom of the bag, what you call the seat.
LikeLike
Is this intended for mini ipad or full size?
LikeLike
Diana, this tutorial is for the ipad but I have another one for the ipad mini https://mypatchwork.wordpress.com/2014/05/10/ipad-mini-beanbag-with-hand-painted-fabric-tutorial/
LikeLike
Thank you Teresa for this tutorial I LOVE it I just have one question do I have to make the flower it is just because I have to make six of these for my cousins as a Secret Santa and I don’t have time. Thank you again for this tutorial you have really inspired me to start sewing and crafting more as I do have a sewing machine that I have gotten as a present but never used but this tutorial has really helped use it.
LikeLike
Sarah, you don’t have to make the flower at all. It’ll work just as well without it.
LikeLike
Thank you Teresa
LikeLike
I have made so many of these in out of leftover fabrics from other projects. I have made a few for a 7″ tablet and other various size smartphones. I have made them with all kinds of fabric, too (denim being my favorite!). PLUS, due to running out of fabric, I turned your daisy into a butterfly by cutting the longer petal the same size as the other three, then sewing them together end to end in the same way as you did, (petals now become wings!) and then used my hot glue gun to add some bling-y jewels or pearls to make the butterfly “body” down the center then trimmed a tad off the bottom two “wings” so that the top two petal/wings were a tad bigger than the bottom two. I hot glued it on to the back of the stand. Too lazy to sew! On the ones I made using the daisy, I have hot glued bling-y jewels to the center of the daisy to give it a little extra pizzazz! I love this tutorial of yours. Thanks for sharing!
LikeLike
Thank you Grace. I’d love to see some pictures. You could upload some to my Flickr pool https://www.flickr.com/groups/1933379@N22/
LikeLike
I have made several from your tutorial. I put polyfil in mine with no cardboard or weights and works fine. I did put polyfil in one and along the bottom strip I put rice which was successful. I washed this one in the washing machine and came out like new, very pleased. Thank you for your tutorial
LikeLike
Thanks for that Carole. I haven´t washed any bags yet but I will given that they come out well.
LikeLike
Teresa, I have been a teacher and there is a percent that never read all the instructions. Yours are awesome. These are going to be great Christmas presents. Thank you so much for sharing your pattern and time. Best to you always, Jessica
LikeLike
Thank you Jessica. I´m happy you´re able to follow the instructions easily. I try to do my best!
LikeLike
A friend of mine got together to make this stand to celebrate our birthdays yesterday and we couldn’t figure it out. The photo shows the long rectangle folded and then part of the flower, but no instructions to do it and do you leave the raw edges on the rectangle? I folded along the 18″ said as per instructions and I ended up with a long tube that doesn’t look like yours. Why would I need that much fabric?The cardboard doesn’t fit. Even trimming it down I wasn’t sure where the cardboard was supposed to go into the tube? On the bottom front? Pushed all the way into the back near the flower? Standing up at the rear? How much do you stuff the tube? Do you stuff the triangle tip? No measurements were given as to the amount of fabric left in front that you sew. After this part is stitched and you fold the fabric left, is there a measurement of what this should measure?
After reading a few comments, some others were as confused as me, yet some managed to figure it out. I suppose it would have been easier to figure out if I had been given more measurements and instructions. I think it looks great and I was so excited to make one, but without more information it’s not going to happen. I really appreciate you took the time to create a free tutorial. I know how much time it takes, but sometimes it’s hard to explain things to everyone as what’s in your head doesn’t always come out in the explanation. Also lack of measurements or other information can make it hard to follow the pattern. If you do ever sell your patterns please have them tested by at least 6 people, preferably more and get feedback from them because a pattern that cannot be followed by everyone and is confusing won’t yield you sales. I test patterns for several bag designers and I know the testers makes all the difference in selling their patterns.
I am only trying to inform and help, please don’t take this as a negative. It’s hard to read some people’s tone in an email or a comment. We blog to inspire and help others, don’t we?
LikeLike
Thank you Daryl for taking the time to comment on my tutorial. I’m sorry you had trouble with this one. I’m not sure where you went wrong. The sizing is correct. Could I have used less fabric? Maybe but this is the way I designed it. I have made two more stands, one for an iPad mini and another one which is very much like this one (I followed my own tutorial!) but using charm squares. You can have a look at those tutorials if you like. Thank you for the sales advice.
LikeLike
This is very well documented with photos and I will be able to figure this out! Thanks! I am going to make a couple of these. My guild is doing a pillow exchange and one of the precepts of modern quilt movement is usability. This fits the bill! The flower decoration is so pretty too.
LikeLiked by 1 person
Just made my first one and despite thinking it would be too small, it’s perfect. Thank you so much for the tutorial. I’m about to go into full scale production for Christmas. All the family are getting one of these this year.
LikeLike
I just made one for my mom and it worked great. Thank you for the info, I will be making one for me next.
LikeLike
It’s Christmas Eve and my 12yr old daughter and I just made one of these for her Nanna to open tomorrow on Christmas Day! It was a very last minute decision to make it, as we only just realised Nanna was one present short! It’s such an easy thing to make and very good for teaching my daugher the basics of machine sewing. After making it, we were thrilled with the results as it works very well (tried on my son’s ipad). I used a sewn bag filled with rice instead of the weight / stone. Thank you so much for posting this Tutorial – I’ve had such a fun Christmas Eve. It’s now wrapped and under the tree! 🙂
LikeLike
That’s lovely Wendy. Thank you for sharing. And thank you everyone for your feedback.
LikeLike
I made 2 of these. 1 for me and the other is for my niece. Thank you for sharing your beautiful creation :-).
LikeLike
I made this, it’s great.
Thanks so much.
LikeLike
Débutante en couture et je viens de le finir pour l offrir à une amie
Tanks for all the détais everything is very clear
LikeLike
Merci! Ça me fait plaisir.
LikeLike
Thank you for this tutorial. Took about 1/2hr to do not perfect, no flower but does the job .
LikeLike
Thanks for this great tutorial, I cannot get the link to work for the pdf for the cardboard base. Is there some way I can see this?
LikeLiked by 1 person
Hi Lynn
Thank you for letting me know of the broken link. I’ve restored it so you should be able to download it now.
LikeLike
many thanks – off to try it out.
Lynn x
LikeLike
Direct address to the pdf just in case https://mypatchwork.files.wordpress.com/2011/09/ipad-beanbag-cardboard-base1.pdf
LikeLike
I’m wondering if this would hold a book? hardcover or soft cover? would you mind testing it out?? I love the pattern and looking to make a book stand as a gift. Would love to know 🙂
LikeLike
Alison, I have used my iPad stands with books. Very thick books may not fit but you could leave a space between the roll and the pyramid bit if you know what I mean. So you stitch two lines with 1/2 inch between.
LikeLike
Teresa,
I am making this iPad stand as I type! Really excited for the turn out. I have just two questions, 1.) when you gathered the flower pieces, did you pin them all together first and using a long stitch, stitch the length of the pinned pieces? I have never gathered before. 2.) how did you attach your button? Did you glue it to the pieces? I have never used a button without the usual four holes…the ones I am using for the iPad stands have one single hole, protruding from the bottom of the button.
Thank you again!
Leanne
LikeLike
Hi Leanne, the button is stitched to the fabric. There’s no trick to it. The stitches will be concealed so don’t worry about how big or small they need to be. When you gather the fabric you can just put a needle through with strong thread, pull together and make a knot so the gathering stays. Again, you can conceal all the threads behind the flower. I hope this helps.
LikeLiked by 1 person
Hi there, working in the iPad stands and am a bit confused as to which way to fold the fabric in half. I did it one way, but the tube was very long and skinny. Undid it, and now the tube seems too short! Do I fold to match the 12 inch sides together to make the tube fatter and shorter? Or do I match the 18 inch sides together to make the tube long and skinny? Advice would help as I’m making this for a gift and want it to be just right! Laura
LikeLiked by 1 person
Hi Laura, you do fold the 18 1/2 inch side. The beanbag is about 9 inches wide. Have you seen the video? I know it’s not exactly the same size but it’s close. And that’s basically what you will get with a piece of fabric, a skinny tube.
LikeLiked by 1 person
Such a great idea! I made my own phone stand and posted some picture in my blog and gave link back to your site. Thank`s for the tutorial 🙂
LikeLike
Tolle Anleitung. Danke für’s Zeigen. LG Betty
LikeLike
Thank you Betty
LikeLike
Adorei!
Ideia genial!
Great work! Great idea!
LikeLiked by 1 person
My daughter and I just made this for her tablet! She is a beginner and this was the perfect pattern for her to follow. Thank you!
LikeLike
That’s great,Heidi, I’m happy it was a good sewing experience for her.😊
LikeLike
First one I made I used a large decorative button with a shank and pinned it from the inside with a diaperpin sized pin. Next one I added a loop near the peak (sewed into the seam). As well as the button. Hope to now try stapling close to the fill before I stitch the opening closed as it seems difficult to keep the fill firm enough for the stand. The tiny pellet fill is too soft, I have used polyfil pillow stuffing from an old pillow, or the filling from a pillow form. Thanks for a great pattern! I have found mine very useful.
LikeLiked by 1 person
I love the loop idea. I use my wedge everyday. I can see it’d be very useful. Thank you 😊
LikeLike
I have made many of these and have not used the cardboard or stone weight and they are very successful. Thank you for your tutorial.
LikeLiked by 1 person
Carole, I agree the weight isn’t really necessary.
LikeLike
Cute tablet stand. I really like the one I made. thanks!
LikeLike
Hello. Thank you for this pattern. I made one for my sister who has very bad arthritis and loves to read. She is 81 and wouldn’t know how to start a couputer. But loves books. So I made the last bit a bit wider to hold a book and it is going to be perfect. Again thank you
LikeLiked by 1 person
That’s great Linda 😊👍
LikeLike
I love the simplicity of this pattern and the wonderful items that it can make. I need something similar to this but would be like a wedge that when a person sleeps on their side can hold a heating pad against their back. I am not sure of the measurements, but will try using a pillow case for starters and get creative with it from there 🙂 Thank you for the ideas
LikeLiked by 1 person
That’s a great idea, it reminds me of those rollers they used to sell, maybe they still do, for babies so that they don’t roll on to their tummies. Good luck with it
LikeLike
I made this for my 86 year old mum who struggles to hold her iPad when we are on a WhatsApp call. I haven’t given it to her yet but I am certain she will love it.
LikeLiked by 1 person
Great
LikeLike