


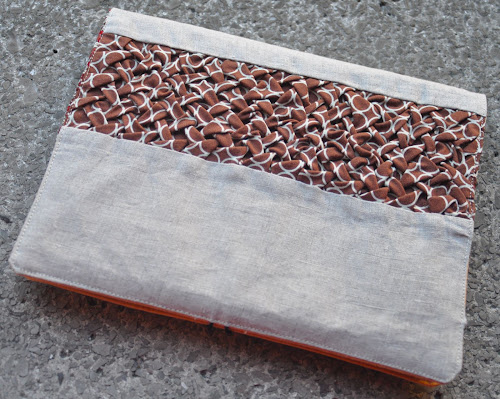
Back of notebook cover. The back features a strip of lattice smocking.
Do you need to make a gift for someone special? Why not making a New Year notebook cover?
Note: For this tutorial I am giving measurements for a notebook whose top cover is 8 3/4 inches high x 7 inches wide and 13 3/4 inches from cover to cover.
BUT this tutorial can be adapted to any notebook size. Just add 1 inch to the initial measurements.
This is how you measure your notebook:
Measure your book all the way around, from top cover edge to bottom cover edge. Do this with the notebook closed.
My notebook is 13 3/4 inches all around.
Now measure the height.
My notebook is 8 3/4 inches high.
Now, add 1 inch to both measurements.
When I add 1 inch I get a rectangle that is 14 3/4 in x 9 3/4 in. This is the final size of cover, lining and fusible interface.
The pockets are the notebook height x whatever the depth you want to use multiplied by 2 (you multiply by 2 because the pockets are folded in half).
In this case each pocket requires a piece of fabric that is 9 3/4 inches x 6 inches. Using a 3 inches deep pocket is ok in most cases though you could use a deeper pocket if you’re covering a large A4 notebook for instance. Just make sure you double the depth. For a 3 inch pocket you need 6 inches fabric for instance.
Materials
Fabric
- Linen for cover
- Stranded cotton in different colours suitable to make a gradient
- Matching cotton fabric for the lattice smocking inside and pockets
Cut
Lining: 1 rectangle 14 3/4 in x 9 3/4 in
Pockets: 2 rectangles 6 in x 9 3/4 in
Cover: 1 rectangle 14 3/4 in x 9 3/4 in. This rectangle is made of 3 pieces:
- 8 3/4 in x 9 3/4 in linen
- 2 1/2 in x 9 3/4 in (lattice smocking)
- 3 3/4 in x9 3/4 in linen
Fusible interfacing (iron on one side)
1 elastic band
1 fabric covered button
Stitch used: seeding stitch
Download pattern: Year characters (pdf)
Instructions
Trace the pattern on a piece of linen and embroider it using seeding stitch doing a gradient.
The photos below show the embroidery progression.

I used several shades of browns and yellows.

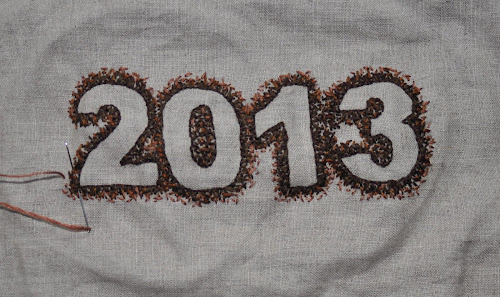


The embroidery is quite tight around the numbers and quite sparse just at the end.

When the embroidery is finished, stretch on a padded surface and lightly press using steam.
Cut the piece to 8 3/4 in x 9 1/2 in.
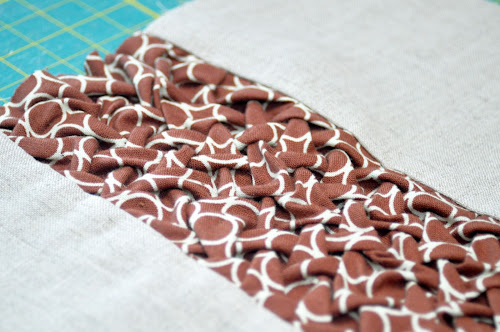
Lattice smocking
The lattice smocking piece is 2 1/2 in x 9 1/2 in when finished.
This is how to make lattice smocking:
To start cut a piece that is 15 in x 7 in. Then follow my lattice smocking tutorial to sew the lattice.
Trim the lattice to the required measure after it has been sewn and stretched, not ironed.
Stitch the embroidery piece, the lattice and the other rectangle into one single piece.

Press making sure the lattice remains intact.

Now cut the rest of the fabric:
Lining: 1 rectangle 14 3/4 in x 9 3/4 in
Pockets: 2 rectangles 6 in x 9 3/4 in

Iron both pocket pieces in half.
Now place the lining fabric right side up.
Place the pockets on top of the lining with the raw edges facing the sides.
Place the piece of rubber band, not longer than 3 inches, over a pocket, as per picture.
Important: The rubber band should be placed just directly under what will be the back of the book cover, i.e. the lattice side. I’m stressing this point because I didn’t pay attention and I had to unpick the band and sew it on the other side.

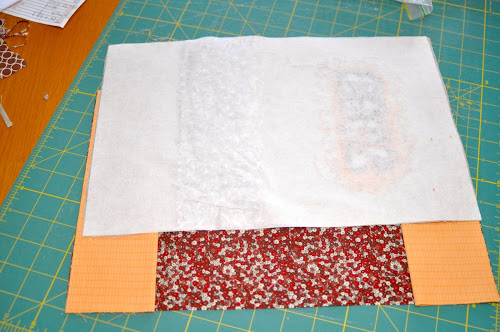
Cut 1 rectangle 14 3/4 in x 9 3/4 in of middle weight of fusible interfacing and iron to the embroidered panel on the wrong side of the panel.
Then place the panel on top of the pockets and lining.
You can see here the elastic band is on the wrong side. It should be on the opposite side, unless you want to stitch the button on the back of the notebook.
Stitch all around the book leaving 1/4 seam allowance and leave a 3 inch opening to turn cover inside out.
Trim corners after stitching.

Turn inside out. Pay special attention to the pockets and don’t get a fright because they look like they’re stitched to the wrong side. Just turn them towards the lining of the notebook.
Top stitch all around the cover as close to the edge as you can.

The cover is done. Insert the notebook.

The finished notebook cover measures about 9 in x 14 in open. The notebook is 7 inches wide when closed.

Looks great! Very helpful tutorial. Thanks 🙂
LikeLike