


This sampler has 12 blocks in it, all of them made from a pinwheel block cut into a 9-patch block an rearranged to obtain 11 different blocks. More variations are possible.
Quilt size
56 inches x 42 inches
Block size
The block is 10 1/4 inch square.
How to make a disappearing pinwheel block
Learn how to make a disappearing pinwheel block and its many variations in less than 2 minutes:
Materials for one disappearing pinwheel block
- Two 9 3/8 inch squares in contrasting fabrics
Notes
The initial 4 half square triangles (HST) obtained need to be trimmed to 6 inch squares.
Block tutorials
Make 12 blocks:
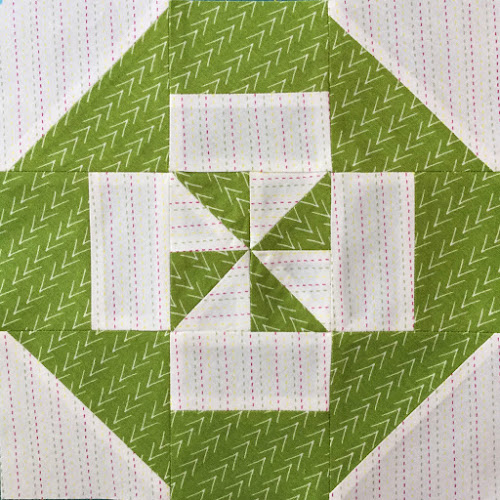
Disappearing pinwheel block – variation 1

Disappearing pinwheel block – variation 2
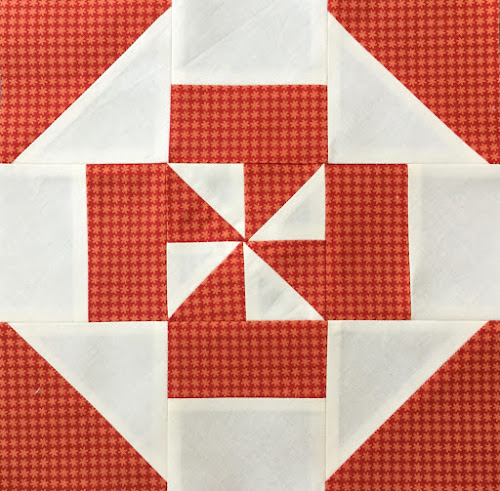
Disappearing pinwheel block – variation 3

Disappearing pinwheel block – variation 4

Disappearing pinwheel block – variation 5
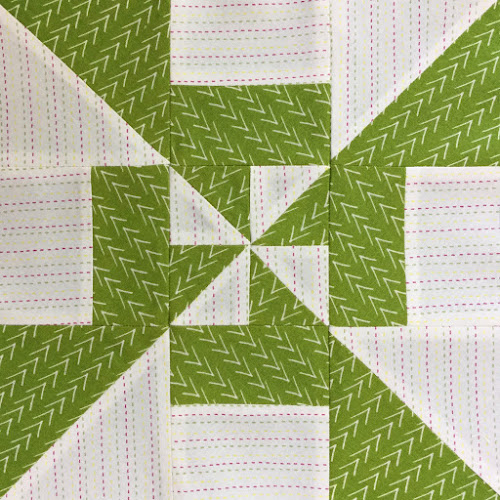
Disappearing pinwheel block – variation 6

Disappearing pinwheel block – variation 7

Disappearing pinwheel block – variation 8

Disappearing pinwheel block – variation 9

Disappearing pinwheel block – variation 10

Disappearing pinwheel block – variation 11 – make 2 blocks in different colours.
Finish the blocks
Add a border to each block.
For each block cut in white fabric:
- 2 strips 10 1/4 x 2 1/2 inch
- 2 strips 14 1/2 x 2 1/2 inch
And sew as shown on the picture below.

Free motion quilting
Each block is quilted individually with free motion quilting.
Learn how to do free motion quilting tutorial in just over 2 minutes:
How to do Quilt-as-you-go (QAYG)
This quilt is put together with quilt-as-you-go (QAYG).
The finished sashing width for this project is 1/2 inch. Learn the technique in under 3 minutes:
Materials
For the one block sandwich
- A piece of backing fabric the same size as the block (I used half square triangles for some blocks to make a star)
- A piece of batting 1 inch larger than the block
- One finished block
For the sashing
- One strip of sashing fabric 1 1/8 inch x the length of the block side
- 1 strip of sashing fabric 1 3/4 inch x the length of the block side
Flange binding
The binding length is 170 inches.
The quilt is finished with machine binding and a flange.
This is how you add faux piping to your quilt:
Machine binding
And finally, sew the binding by machine.
Learn in 3 minute how to sew the binding to the quilt:


I accidentally ran into this site and wow am I glad I did, great tutorials, and easy to understand.
LikeLiked by 1 person
Not able to download free pattern.
LikeLiked by 1 person
Were do you get the extra 1/2″ needed for the centre square?
LikeLiked by 1 person
Thanks Gillian. I had a mistake in my sizing. The strips are 10 1/4 x 2 1/2 not 10 1/2 inch.
LikeLike
Hi Gillian, for the centre square?
LikeLike
Accidently found this site and I just love it. So much information for us beginners! Thanks, keep up the good work.
LikeLike
Looking forward to your tutorials. Thanks so much!
LikeLiked by 1 person
Thank you!
LikeLike
I stumbled across your site last night, and as soon as I could I’ve started making this amazing looking quilt. However I’m stuck. Your pinwheel before you cut it looks to be 12″ and then you cut it at 4″. However, my 6″ squares only sewed together to make a 11.5″ pinwheel block. I’m going to try 2 things – remaking the pinwheel with 6 1/4″ squares, and trying to figure out how to cut my 11.5″ block into three even pieces.
LikeLiked by 1 person
Hi Megan, you have to bear in mind that with this type of slicing technique the measurements may be a bit imprecise. The best way to make this disappearing pinwheel is not to focus too much on the final size but to (1) make sure all half square triangles are the same size, (2) when they’re the same size, sew them into a pinwheel (3) divide the sides of the pinwheel int0 3 equal parts on both directions and (4) trim all 9 pieces to the same size again and sew together
LikeLike
I love watching your tutorials but I do best with written instructions. Are your books for sale and how would I get the books especially the 9 patch made into different shapes. 4 patch. Jan Schiltz
LikeLiked by 1 person
Hi Jan, my book has a disappearing nine patch block with 4 variations. Here’s more info and link to Amazon https://mypatchwork.wordpress.com/2018/07/23/announcing-my-book-turnabout-patchwork-simple-quilts-with-a-twist/
LikeLike
I like your tutorials because you don’t do a lot of talking, just demonstration. I can pause the video, or back it up until I feel comfortable with the steps.
Hyla
LikeLiked by 1 person
Your piece cutting instructions have really made a difference in my fascination with top making. Its so much easier to do a top with minimal sewing of small pieces I think you have taught me the most when it comes to top making. I would say quilt making but I rarely make a quilt with the tops. imagine the stack of finished tops I have, they sit on the couch my husband just shakes his head when he looks at the stack, LOL
LikeLike