

Over the years I’ve been put off learning foundation piecing because I just didn’t think I had the need, but as I do more and more complex patchwork I decided I’d give it a serious try and see if I could make it work for me.
The learning process so far has been a lot easier than I expected. I’ve made a list of pros and cons based on my limited experience with foundation piecing.
Pros
- blocks look almost perfect
- very easy once you get the hang of it
- very complex blocks are easier to make
- blocks look great from the back, no messy threads and seams – not that it matters than much
Cons
- fabric wastage
- not worth the extra effort for easy straight forward blocks
- it may be a bit difficult to grasp at the start so I suggest you view several tutorials in youtube before you start
- you need a printer
- you need to remove the paper once the block is done
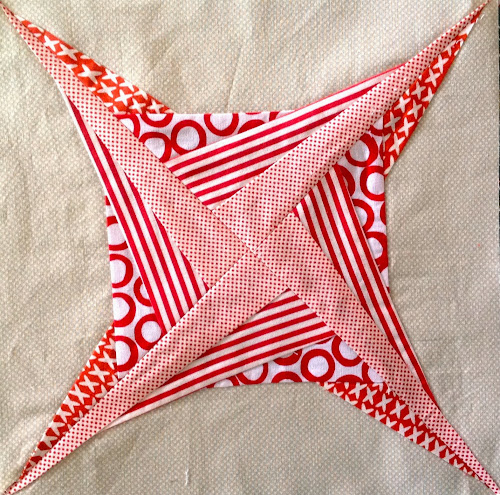
Block Zeppelin
For this step by step demonstration I’m going to be using a block designed by 627handworks. The block is called Zeppelin.
You need to download it (pdf) and print 4 copies. After printing the pattern just cut around the triangle leaving about 1/2 inch around.
The tutorial calls for legal size paper but can also be printed in two pages and taped if you only have A4 paper handy. I only had A4 but instead of taping the two pieces I resized it to about 80%.
How to do foundation paper piecing
You can learn the principles of foundation piecing on this 2 minute video. These principles can be applied to any foundation piecing blocks no matter how complex they are.
Materials
You will need at least 5 different fabrics for it. I chose a red and white/grey combination.

Cut the strips
To avoid wasting fabric as much as possible, cut a strip of fabric for each section that is 1/4 inch larger on each side of the widest part of the section to cover. To do this measure the width of the section and add 1/4 in to each side.

Then measure the longest part of the segment and add again 1/4 inch to each side.

You have now the strip size to cut.
For example, my strip for section 5 is 7 1/2 in x 1 3/4 in. Reminder: My pattern was printed at 80% not the full size.

Do this for each section to cut.

Folding the paper along the printed lines
Folding is done in order to trim excess fabric. The reason for folding will become obvious later on in the tutorial.
Now you need to fold the paper along each line. Use a thin piece of cardboard to help yourself do this.


Fold well along each line. Do not fold past each line.

You don’t need to fold the lines around the whole triangle.

Important things to bear in mind
- Fabric pieces are placed on the back of the paper
- Stitching is from the front of the paper following the printed lines
- Pieces have to be stitched in ascending order
Preparation of piece 1
So starting at piece 1, place the strip wrong sides together with one of the long sides overlapping by 1/4 inches the middle printed line between pieces 1 and 3.
* The first piece is placed with the right side up on the back of the paper
Pin.
Make sure that the whole section is covered by the fabric and overlaps at least 1/4 in all around. The 1/4 in is the seam allowance. Lift the piece, hold it in front of the sun to see through.

Before we stitch pieces 1 and 2 together, fabric excess needs to be trimmed.
To find out how much fabric needs to be trimmed, fold the paper back along the line separating section 1 and 2.

Place the ruler as per picture so that you trim the fabric leaving a 1/4 in seam allowance.

Trim off excess fabric.
As you can see, having folded the paper beforehand makes it easier to fold back at this stage.
Stitching of pieces
Now the stitching starts.
Stitch piece 2 by placing it over piece 1 as per picture, right sides facing together.
Align piece number 2 along the edge of piece 1 making sure that piece 2 covers all surface area including 1/4 inch all around.
Pin.

Turn around and stitch along the line between 1 and 2 from the front of the paper as per picture.

Turn around and fold piece over. You can press if you need to.
Otherwise trim piece 2 leaving 1/4 in allowance.

Then fold over the line between 2 and 3 and trim again leaving 1/4 in allowance.

Now stitch the next piece in the same way as the previous one.
Get strip 3 and again place it aligned against the previous 2 pieces 2 and 3. Place the strip making sure that it covers the length of the section including 1/4 seam allowance on each side.

Turn paper around and stitch along the line to the left of 3 on the printed side.

Trim and continue.
Repeat the previous steps until you’ve stitched all strips.


Finally trim the big triangle.

One down, 3 to go.


Voilà!
Next week I’ll post a tutorial on how you can use this block.

Como conseguir os moldes para fondantion prontos? amo essa tecnica porem acho muito dificel fazer o molde.
LikeLike
I love this idea, The pattern is beautiful! DId you use the quilted teflon fabric for the back and batting inside? Just looking to see if I can find the assembly of the pot holder itself. Thanks for sharing Nancy
LikeLike
Hi Nancy, thanks. I used just regular batting.
LikeLike