

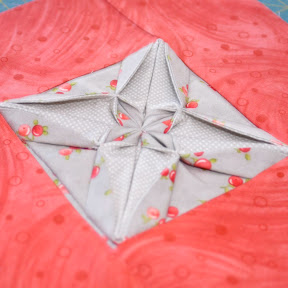
Quilt closeup
Make the quilt
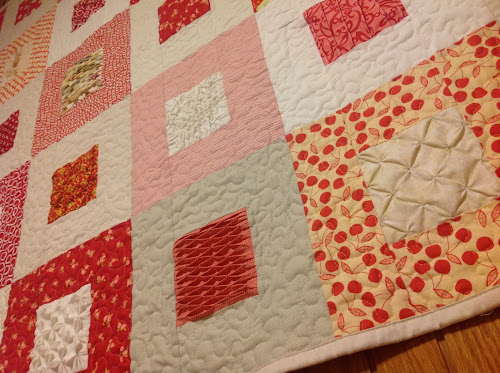
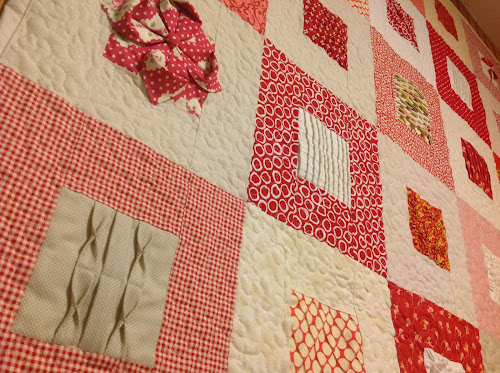
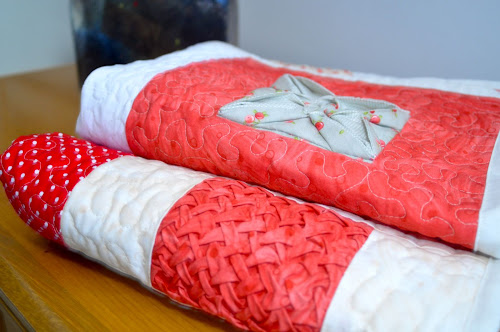
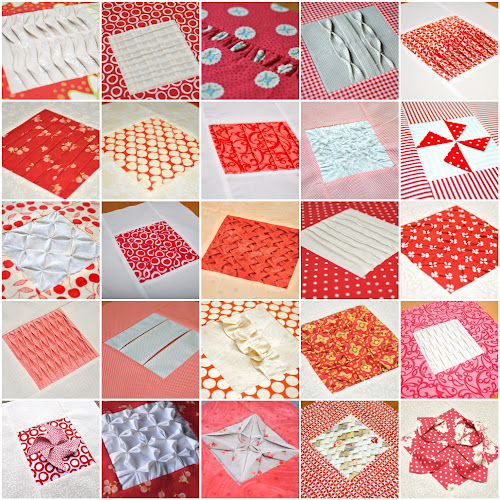
This is my first sampler quilt that explores texture in fabric. The second one is a 4-patch textured quilt.
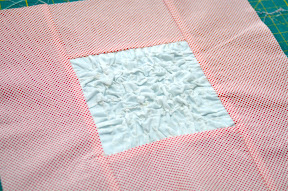
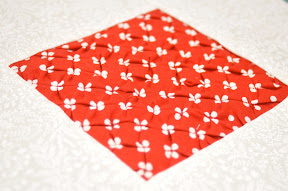
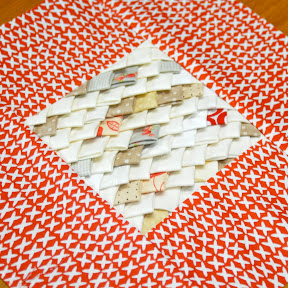
The quilt has 25 blocks. Each block is made out of a centre 5 inch square featuring some fabric texture such as pin tucks, smocking, shirring and the like. Then a 3 1/2 wide border encloses each centre square.
The colour scheme is red and white/cream alternating reds and white/cream for the centre square and border.
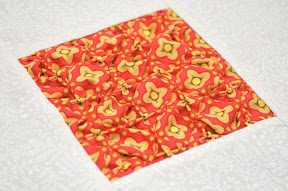
Some of the textures show better on plain colours than on heavily patterned fabric.
Block type: log cabin.
Block size: 11 inches.
Colour scheme: reds and neutrals.
Quilt size: The finished quilt is 52 1/2 x 52 1/2 inches.
The quilt is made with fabric scraps and therefore the tutorial does not include exact fabric needs.
Quilt pattern
You can buy the compilation of textured block tutorials into one single PDF download.
Block tutorials

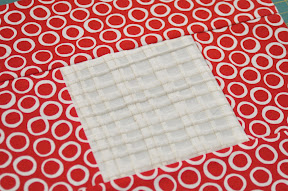
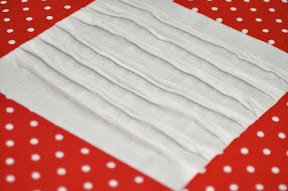
Block 1: Pin tucks
Block 2: Diamond pin tucks
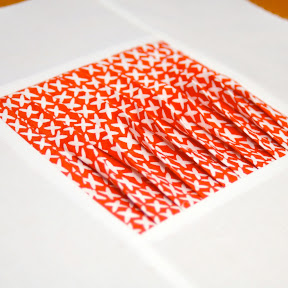
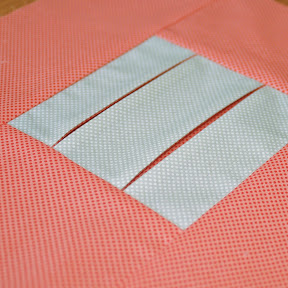
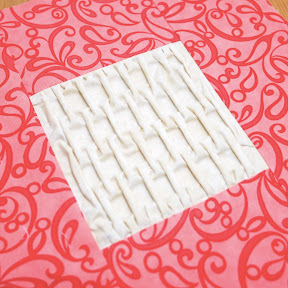
Block 3: Double controlled pleats
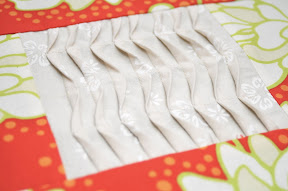
Block 4: Doubled controlled pleats with ripple effect

Block 5: Centered tucks with bow ties
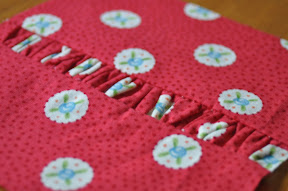
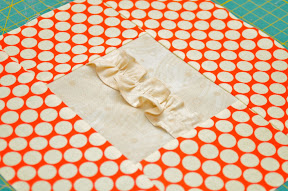
Block 6: Gathered strip
Block 7: Cross pin tucks
Block 8: Undulating tucks
Block 9: Cross shirring
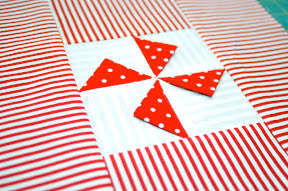
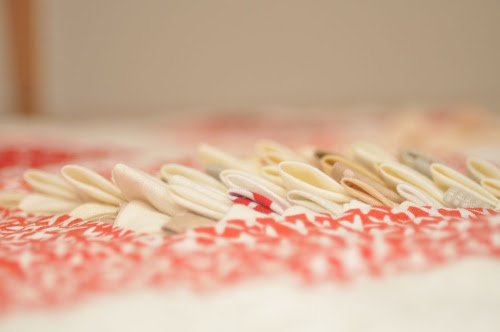
Block 10: Prairie points pinwheel

Block 11: Star gathering

Block 12: Puff gathering
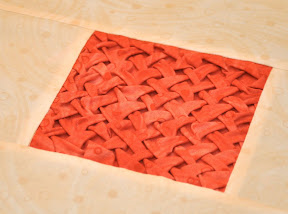
Block 13: Lattice smocking
Block 14: Cluster tucks
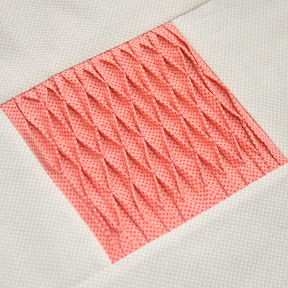
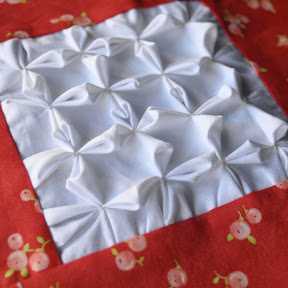
Block 15: Diamond smocking
Block 16: Smocked tucks
Block 17: Pleated peek a boo
Block 18: Gathered double edged ruffles
Block 19: Smocked diamonds and puff gathering

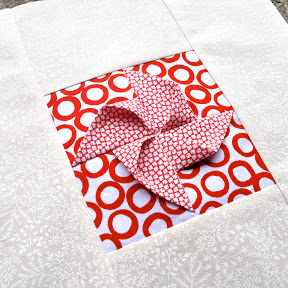
Block 20: Origami flower
Block 21: Lozenge smocking
Block 22: Origami pinwheel
Block 23: Lotus flower smocking
Block 24: Fabric origami
Block 25: Echidna block
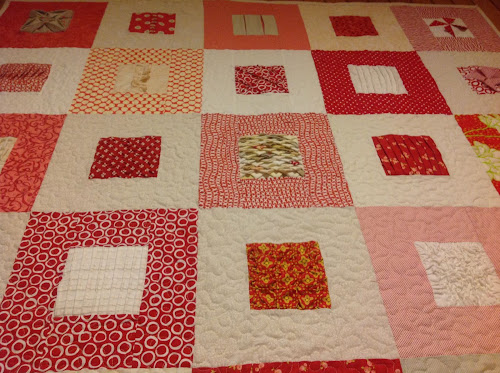
Quilt layout
The diagram below shows how I arranged the blocks trying to distribute techniques evenly.
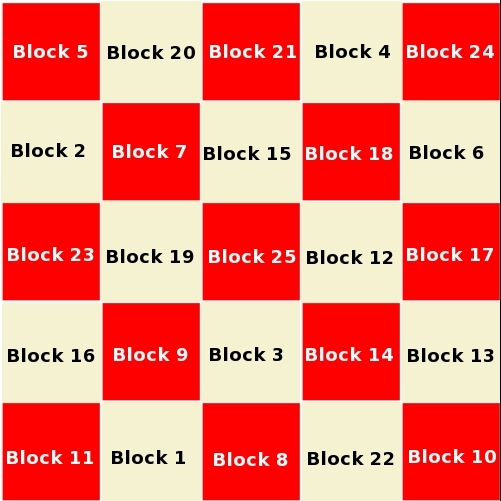
To assemble follow the diagram and stitch blocks on rows and then stitch rows together again.
Iron to the darker side.
Add your photos to the Textured quilt blocks Flickr pool.

If you haven’t had enough of textures, check out my other textured quilt, a 16 block 4-patch textured quilt.

Oh, my!!! I sooo want to give all of these a try! I want to start right away, but don’t think I have time, maybe just one square a week might be a nice goal. Wonderful inspiration! Thank you.
LikeLiked by 1 person
I hope that you are going to do a tutorial on these. They are awesome!
LikeLike
Click on the link below each photo for a tutorial
LikeLike
Loved the concept and the examples are inspiring… Want to try it yesterday if not sooner.
LikeLike
Wonderful!! Thanks for the link.
LikeLike
Thank you for all of these blocks. I have an outreach program for ladies who have all kinds of issues and with your blocks these will work for them and not overwhelm them. Of course I am not going to tell them at first but as their stash grows it will give them the confidence to finish it.
Thank you again for your work.
LikeLike
Diannah, I’m glad you can use my tutorials in your outrexh program.
LikeLike
I just found this site. I am definitely going to make this sampler. I am fasinated by all the techniques. Thank you so much for sharing.
LikeLike
It´s amazing 😀
LikeLike
Hi Tersa:
I started the quilt with one block a week (still not telling the ladies what it is for) and had such a wonderful experience. The ladies were asked to pick out colours that they liked and each week , put the finished block in the drawer and add to it. This is not an easy task due the multiple health and emotional issues. I can’t wait to see the finished piece. Teresa, we will send you the pics of the finished project.
Thanks again for your wonderful program.
LikeLike
OMG! I just saw the prairie points on a styrofoam ball. I am so excited to have my ladies in my group try this one.
Thank you very much for your projects. The only thing I can say is God Bless and may your ideas follow freely through your heart.
Thanks again
Diannah
LikeLike
Wow! I just found your blog today. What a FABULOUS QUILT! It must have been so much fun to make. Thank you for offering the tutorials.
LikeLike
I also just found this quilt and am very excited to try it. I have been quilting for years but the past 4 years have been hard for me because of health issues. Now that I am finally starting to feel better I have been looking for something to do. I love the two color plan, what do you think it would look like scrappy? I don’t think as good as the two colors……..
Thank you again.
LikeLike
I have just started this quilt and have chosen to use only solids in as many colors and I already have or can find during the process. So far so good. Thanks for sharing this quilt and the tutorials.
LikeLike
This is great Barbara. I must admit that after I started the project I realised that using solids would have shown the textures better. Don’t forget to show us some pictures at the Flickr group http://www.flickr.com/groups/2086081@N20/pool/
LikeLike
Love your ideas
LikeLike
These are awesome, thanks for the tutorials. The fabric origami is actually REALLY simple, I just used an embroidery scissor to help me shape the folds (a dpn should work even better). I had some troubles with the bulk of it thuogh, so when attaching the border, I think it might be easier making the border edges a lot larger and use a zipper foot to attach them, then marking the edges where it needs trimming and cutting it from the outside, so you’ll never have to fight the bulk of the center piece.
LikeLike
What is the best way to save instructions without having to print a hundred pages? Can I save the whole thing on my computer and come back to it later? I love the texture but will need to do it a bit at a time.
LikeLike
You can bookmark the page and go back to refer to it every time or you could copy the tutorial and paste it into a word document maybe if you want to have a copy of it offline. I’m not going to take the tutorials off so probably bookmarking the page is the best option.
LikeLike
Victoria, save it to your desk top and then you can open it and print only the pages you need, a few at a time.
LikeLike
That’s. So. Cool.
Wow.
LikeLike
My daughter just sent over a link to your amazing quilt!! I am in awe. I am inspired. And I must say Thank you!
Being a dabbler at heart, creating a quilt that is the same from block to block will never happen. But this quilt seriously appeals to me! A multiple learning experience and a dabbler’s enchantment!
LikeLike
All your work is inspiring and the instructions easy to follow-keep on sewing and finding new avenues for us to explore -sue
LikeLike
This is a wonderful tutorial, thank you so very much for taking the time and effort to make it and share it. I was positively stunned when I found it. I’d never even thought of using textured squares in a quilt. Your quilt is lovely.
LikeLike
Wow! I did a quick glance at the tutorials and I cannot wait to start. Just a question for you. It looks like you used a regular foot for the tutorials looked at. I have some special feet like a pintuck foot but really have no idea how to use them…do you ever use special feet or just the regular sewing machine foot
LikeLike
Hi Eileen. My machine came with lots of feet but I tend to use just a few and for the tutorials I did use a regular foot, yes.
LikeLike
That quilt is a masterpiece – and the directions are icing on the cake! WOW!!!! Thanks for sharing.
LikeLike
this is sweet! thanks much
LikeLike
Thanks for the reply! I pulled fabric from my stash and am ready to begin!
LikeLike
I am in a small quilt group that has started a Round Robin quilt project. The block I have now is for someone who wanted texture in her quilt. What a great find your tutorials have been. I can’t wait for her to see what I have added.
LikeLike
If you ever post any pictures Mary Jo I’d like to see them.
LikeLike
These blocks are amazing! I’m going to attempt a sampler quilt for a fundraising auction our guild does every year. Do you happen to have a source/book for these manipulations as well?
LikeLike
Hi Patti
If you do a google search on fabric manipulation you’ll find heaps of resources on this subject.
LikeLike
Thanks, Teresa. I especially love the smocking blocks
LikeLike
This is a fantastic group of tutorials. I’m also a smocking fan – and returning to sewing after a long time away. So generous and helpful – thanks! I was specifically looking for diamond smocking with polka dots, because I thought that would be a good starter project… and I had the fabric 🙂 Your combo of visutals plus words are absolutely top notch (and the red, cream/white mix of fabrics is really inspiring).
I will most definitely be experimenting with many more of your wonderful 25. There is a good book on fabric manipulation with wonderful pictures – how I love texture! I can imagine some of these making wonderful pockets on baby gifts – actually I can imagine a wonderful baby block using 6 of these…
LikeLike
Thank you Sarah. I’ll be working with textures again.
LikeLike
Thank you so much for creating this lovely quilt and letting us see how you made each block. I have plans to make one for myself … Thanks again!
LikeLike
Well what can one say, the way you have done quilt is just beautiful I like it very muuch
LikeLike
This looks amazing. I can’t wait to try the blocks.
LikeLike
Hi from Qld AU .. Well done I have to say I wait eagerly for your next post Terresa … I LOVE the texture of your blocks … I haven’t the time at present to start your design but thinking I am going to make it like a wedding quilt , creams, coffee colours etc ..maybe some special lace here and there – I am always looking for quilt designs that are creative and have texture and you are my inspiration. You are doing so very well I admire your talent greatly .. Best wishes and the long weekend here in Aus. Regards Joyclyn
LikeLike
Thank you Joyclyn, enjoy the long weekend.
LikeLike
omg, this is beautiful work. At first I didn’t notice that all the instructions were with each block, and had to think how I would figure it out. Thank you so much for an excellent tutorial. Why is it we only hear about bad people in the world and not someone like TeresaDownUnder. Just found you from the Craftsy site. Thank You Thank You
LikeLike
Thanks Rita for your kind words.
LikeLike
Hi Teresa,
These are absolutely great tutorials. I have recommended them on my blog post Sewing Textures by Vanessa Christenson on Craftsy Review as an alternative option to the Craftsy class. Thank you so much for all the effort that you put in making the tutorials; they are just excellent.
LikeLike
Thank you for the feedback. I’m currently doing a new textured quilt with new textures if you’re interested. https://mypatchwork.wordpress.com/quilt-tutorials/textured-4-patch-quilt-tutorial/
LikeLike
These are gorgeous! I am wanting to add some texture to a quilt I plan to make for my daughter. That origami flower is awesome (but I should probably start with something mord simple;). How does the manipulated fabric wash up?
LikeLike
Thank you LauraC. I haven’t washed any of the textures yet but I guess some may wash better than others. The origami flowers may not be the best choice unless you add something to the raw edges beforehand. All smocking textures should be fine, tucks and pleats should be fine too.
LikeLike
WOW! just WOW!
LikeLike
Oh my..the detail in this quilt is just amazing. Seems so simple at first but well done on those pleats and tucks. Truly a talent! This deisgn is ideal for toddlers who are amazed by different textures.
LikeLike
Amazing blocks.
LikeLiked by 1 person
Hi Theresa, I wanted to post photos of my version of your textured quilt, but can’t without signing up for things I don’t want. I have thoroughly enjoyed making this quilt and experimenting with other textures where odd ones didn’t suit my fabric or inclination. I love it in these colours as it’s so controlled and have made two matching cushions exploring other folding techniques and some of your others from the 3 patch tutorials. Thanks for the not inconsiderable work you put into these tutorials. My French patchwork group are all interested now.
LikeLiked by 1 person
Eileen thank you for your feedback. It makes me happy that you liked my idea and you made your own quilt. You can send me some pictures Do you have Facebook? You can send them via a message to my page, or you can send me your email via my About page and I’ll reply with my email https://mypatchwork.wordpress.com/about-this-blog/
LikeLike
love it!
LikeLiked by 1 person
Thank you!
LikeLike
This project is so darn beautiful. Thank you.
LikeLike
Thank you Susan.
LikeLike
I’ve been pinning all of the texture tutorials with the thought of making a quilt using them. This is so cool now I don’t have to figure out size. Thank you.
LikeLike
I can only echo what the others have said about this project: it’s amazing! I love the different textures, and will try some of the designs.
Texture isn’t used nearly enough in quilts, I think!
LikeLike