

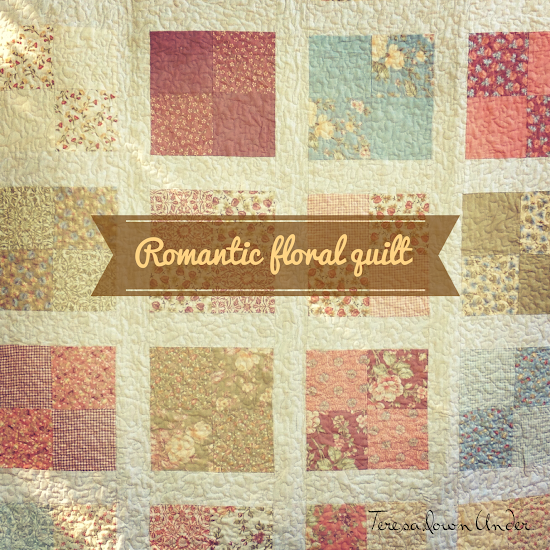
This quilt is as easy as it gets. The blocks are easy four patch. To make it even easier use pre cut charm squares.
So let’s learn first how to make a four patch quilt block using 5″ squares.
It just takes 2 minutes!
Quilt finished size: 41 3/4 in x 53 1/4 in.
Materials
- 2 charm packs (usually each pack contains 42 x 5 in squares) or 80 x 5 inch fabric squares
- 1 yard of cream fabric for sashing
- 45 in x 55 in backing fabric
- 45 in x 55 in quilt batting
- half yard for binding. You will need a long strip 2 in x 192 in
Instructions
This quilt has 20 four patch blocks.
Arrange the charm squares to your liking ensuring there’s enough contrast in the chosen fabrics.
You will be making 20 blocks like this one:

Stitch left and right squares together in two rows. Then stitch both rows together.
Once you have all 20 four patch blocks stitched, it’s time to add the sashing.
Cut and add the sashing
This quilt can be done as Quilt as you go or QAYG:
or or you can do it the traditional way:
For the sashing you’ll need to cut
- three 3 in x 53 1/4 in strips and
- sixteen 3 in x 9 in strips.
Now let’s add the sashing.
Before you start, arrange the placement of the blocks on a flat surface.
Now take one block and stitch a short strip to the bottom of the block.
Add the next block, and another short strip.
Do this 5 times until you have stitched 5 blocks in a column. Ensure that there is no sashing at the top and bottom of each column.
Do the steps above for make 3 more columns.
Now stitch the 4 columns using the long strips as per picture.

You’re almost done.
You just need to cut the batting and the backing fabric and quilt the three pieces together.
Machine binding
I have been machine binding my quilts lately. It takes a small fraction of the time compared to slip stitching them at the back.
To machine bind a quilt, you need to place the binding on the back of the quilt, aligned to the edge of the quilt, as opposed to stitching it to the front first.
For small lap quilts I don’t use binding cut on the bias but just cut straight from across the grain of the fabric.
To start, cut a strip about 225 in x 2 1/2 in. You’ll need to cut several strips and piece them together to obtain this length.
Fold the strip in half and iron well.
Take the quilt on the back and place the raw edge of the strip aligned with the quilt edge.

Mitered corners
Stitch all the way to the corner stopping at 1/4 in from the edge.

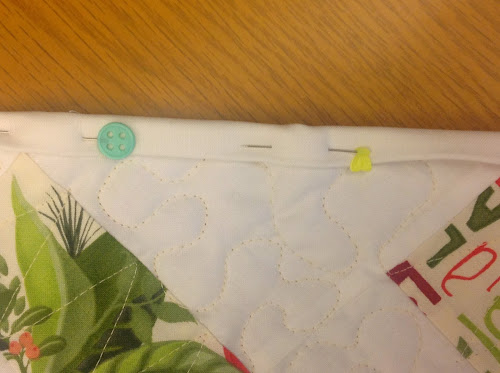
Now fold the strip up in a 45 degree angle as per picture.

Then fold the strip back aligning the fold with the top edge as per picture. Pin.

Now stitch all the way to the end again, stopping at 1/4 from the corner and do the same again for the next corner.

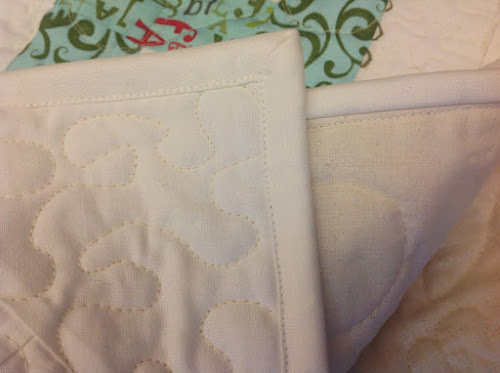
Once you have done the stitching your top will look like this.

Now fold the strip back over the top of the quilt. The binding will cover the raw edge all the way to covering the stitching line.
When you reach a corner, with your finger fold the mitred corner as per picture. First fold in a 90 degree angle the binding at the corner.

And then fold back again as per picture making sure you align both corners.
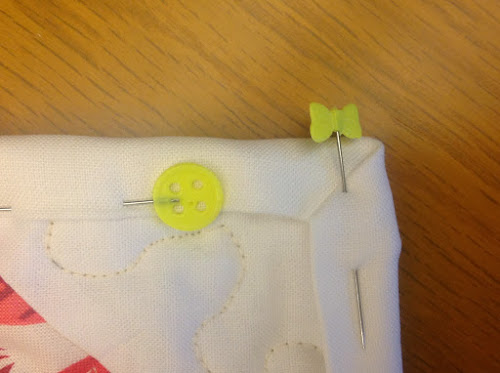
Pin the whole quilt binding this way.

And now top stitch as close to the edge as possible.

The binding is done.
The quilt is finished!


That is so lovely! Its so nice of you to provide instructions. I always do my binding by machine also. Thank you.
LikeLike
You share so much on your website and I just wanted to say thank you for your generosity.
LikeLike
It’s a lovely quilt and your tutorial is excellent.
LikeLike
Thank you.
LikeLike
in this quilt adding the sashing , You say to add the sashing to the bottom and the next instruction you say make sure you have no sashing on the top or bottom. I am a bit confused
Date: Sat, 17 Jan 2015 02:21:39 +0000 To: zinda_p@hotmail.com
LikeLike
Thank you, love all your tut9
LikeLiked by 1 person
Thank you Jeanice
LikeLike
Can you print a tutorial or buy one?
LikeLiked by 1 person
Sorry Julia. The only available instructions for this quilt are on my post.
LikeLike
Teresa, I just recently found your YouTube channel. You are so easy to follow. Thank you for all you do! Victorious
LikeLiked by 1 person